Setting up a VPN on your UDM Pro lets you securely access your home network from anywhere. But many users get stuck with confusing settings, firewall rules, or unstable connections.
In this guide, we’ll walk you through setting up VPN access to your home network on a UDM Pro. You’ll learn the easiest built-in option first, then manual WireGuard and L2TP setups, and the key best practices that keep your connection fast, stable, and secure when you’re away from home.
Key Takeaways
|
What You Need Before Setting Up a VPN on UDM Pro
Before you start configuring a VPN on your UDM Pro, it’s important to make sure your system and network are ready. A few checks upfront will save you time and prevent common connection issues later.
Hardware and Software Prerequisites
To set up a VPN to your home network on UDM Pro, you’ll need the following:
- UDM Pro / UDM Pro SE or Next-Gen Gateway: Works with UDM Pro, UDM Pro SE, and other UniFi gateways such as UDR or UXG.
- UniFi Network Application installed: Your gateway must be running the UniFi Network Application through UniFi OS.
- Latest UniFi OS firmware: Update to the latest stable release to ensure access to Teleport VPN and WireGuard support, plus security fixes.
- UniFi Remote Access is required for Teleport VPN. Path: Settings → Console Settings → Remote Access Make sure the console is linked to your UI Account.
- Client software on remote devices
- Teleport VPN: WiFiman app (iOS, Android, Windows, macOS)
- WireGuard: Official WireGuard client app
- L2TP/IPsec: Built-in VPN client on most operating systems
Network Information & Configuration Details
Your internet and network setup directly affect VPN reliability.
- Public IP address from your ISP: Your UDM Pro must be reachable from the internet.
- Static IP (recommended): Ensures consistent VPN access, especially for WireGuard and L2TP/IPsec.
- Dynamic DNS (DDNS) – if no static IP: If your ISP changes your IP, configure DDNS on the UDM Pro (e.g., DuckDNS).
Use the hostname instead of an IP when connecting. - Port forwarding (only in special cases) is required only if:
- Your UDM Pro is behind another router (Double NAT)
- You are not using Teleport.
- WireGuard: UDP 51820 forwarded to the UDM Pro WAN IP
- Teleport VPN avoids this problem and works even behind CGNAT or Double NAT.
- Dedicated VPN IP range: Set a non-conflicting subnet for VPN clients, such as: 10.10.10.0/24. This prevents routing and firewall conflicts.
Authentication Credentials
How users authenticate depends on the VPN method you choose.
- UI Account (Teleport VPN): Uses your UniFi account to generate secure invite links. No manual credentials required.
- L2TP/IPsec users: Unique username and password per user, pre-shared key (PSK) configured on the UDM Pro
- WireGuard users
- Each device gets its own cryptographic key pair
- More secure and faster than traditional password-based VPNs
With these requirements in place, you’re ready to choose the VPN method that best fits your home network and start configuring your UDM Pro securely.
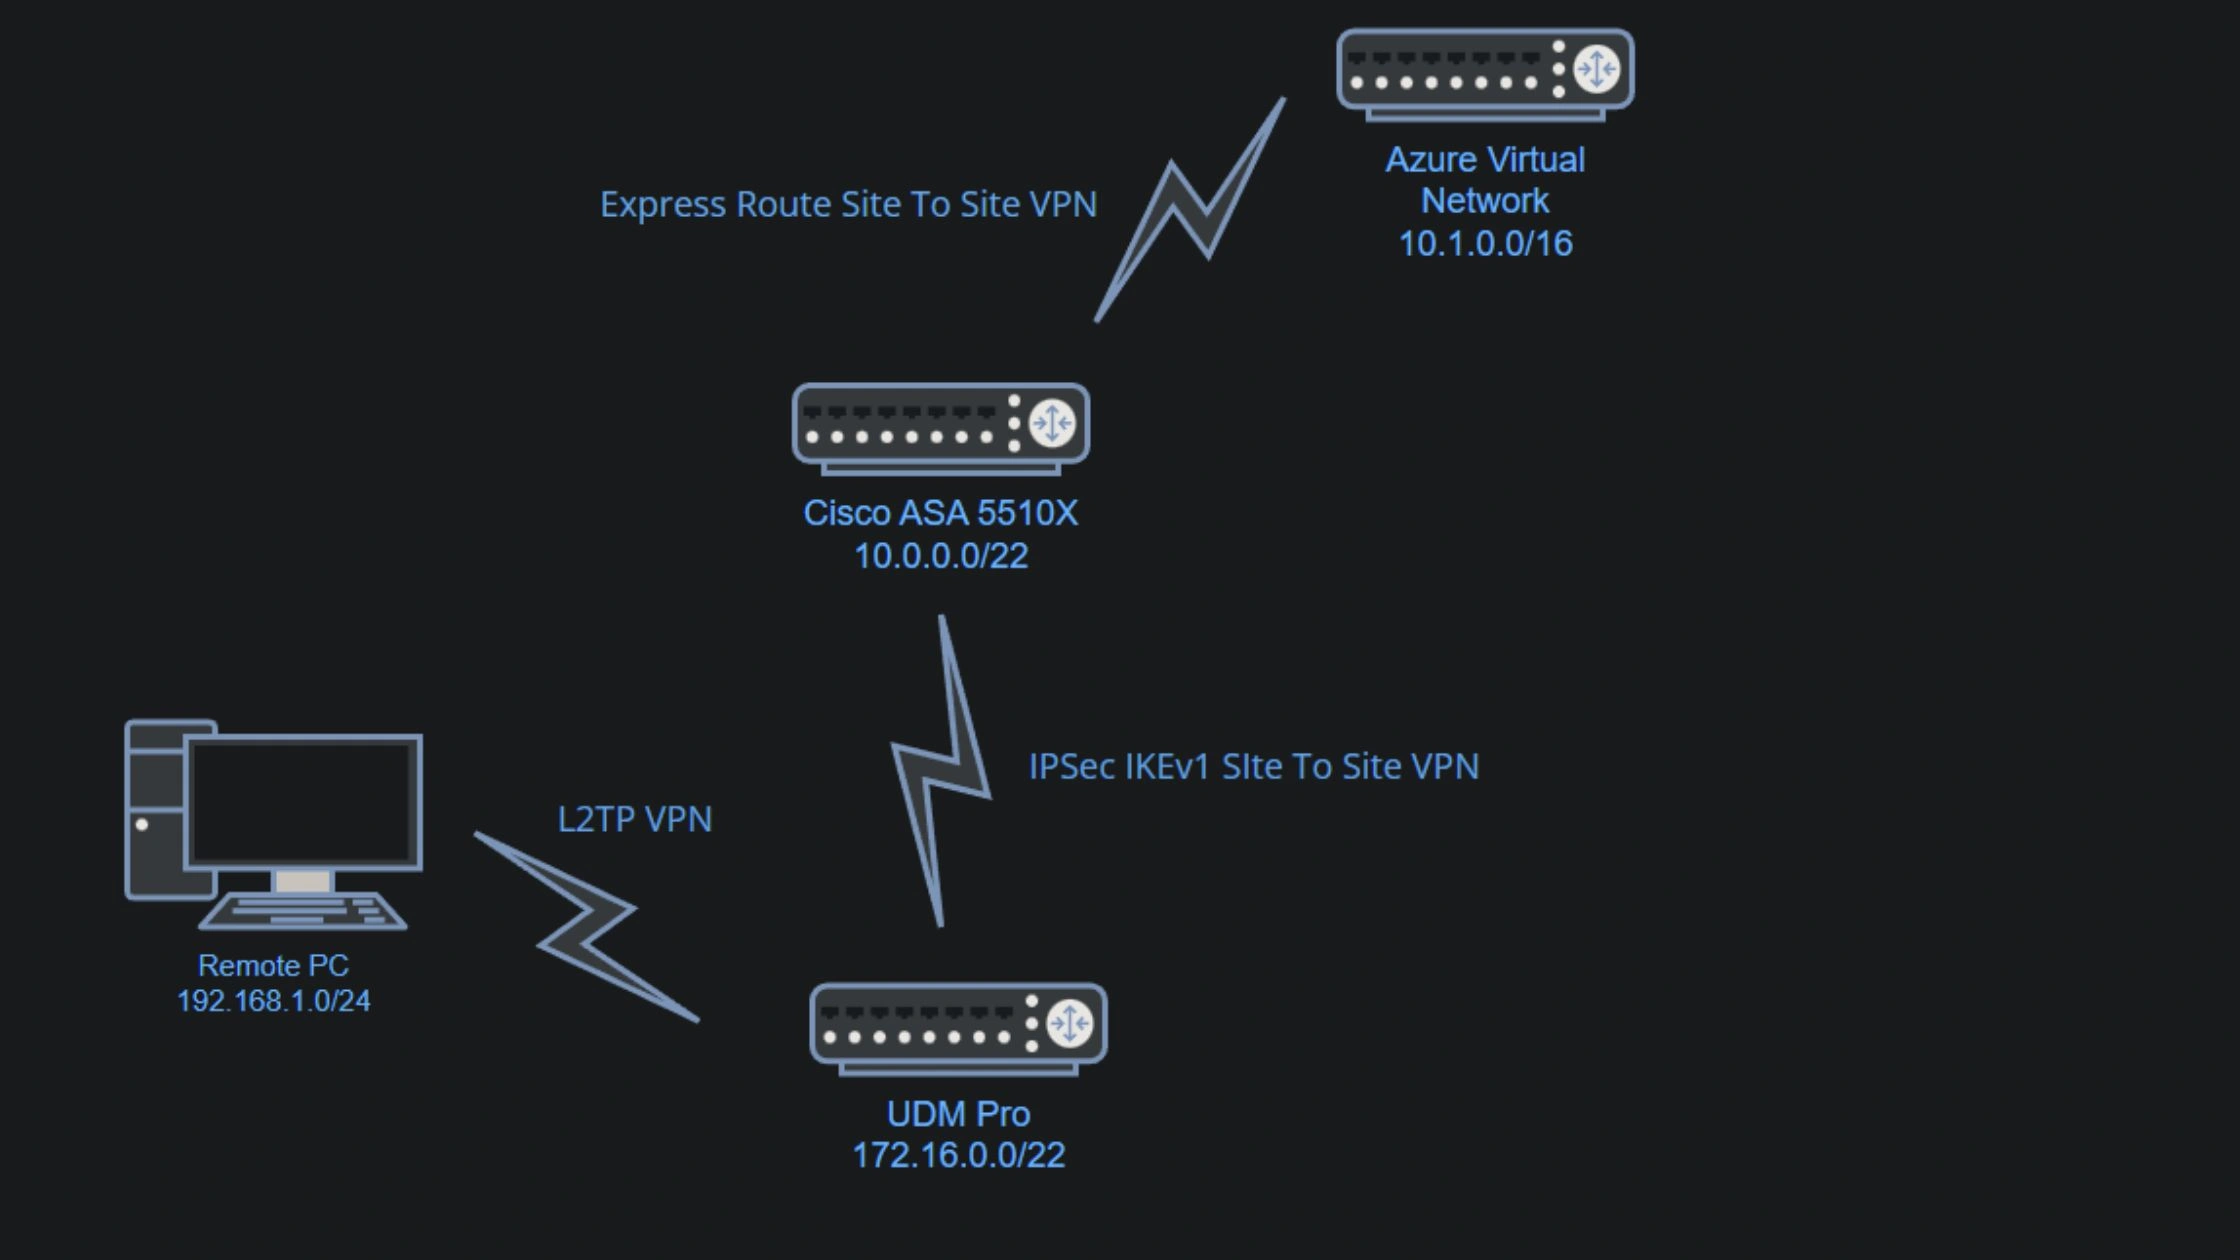
Understanding How VPN Works on UDM Pro
The UDM Pro can handle VPNs in two different ways. It can accept remote connections into your home network, or it can send your home traffic out through a VPN provider. Understanding this difference helps you choose the right setup.
As a VPN Server
When used as a VPN server, the UDM Pro becomes the secure endpoint for your home network. Your laptop, phone, or tablet connects back to the UDM Pro over the internet, giving you safe access to local devices like NAS, cameras, or internal services.
Traffic flow and encryption
- The client device (phone, laptop) encrypts all VPN traffic first.
- The encrypted traffic travels over the public internet.
- The UDM Pro receives the traffic, decrypts it, and forwards it into your internal network.
- Responses from your home devices are encrypted again by the UDM Pro before being sent back to the client.
In this setup:
- Encryption/decryption happens only at the endpoints.
- Your ISP and any intermediate networks can see that traffic exists, but cannot see the content.
Routing, NAT, and firewall behavior
- The UDM Pro assigns the VPN client an IP address from a dedicated VPN subnet.
- Routing rules allow VPN traffic to reach specific LAN or VLAN networks.
- The firewall treats VPN clients like internal devices, but still applies UniFi firewall rules.
- NAT is usually handled automatically by UniFi, so VPN clients can access LAN devices without extra configuration.
Supported VPN server options on UDM Pro:
- Teleport (WireGuard-based)
This is the easiest option. It uses UniFi’s Teleport system with WiFiman. There is no manual configuration, no port forwarding, and no firewall rules to manage. You simply send an invite link and connect. Performance is fast and stable. - WireGuard
WireGuard is a modern, high-speed VPN protocol built directly into UniFi OS. It offers better performance and stronger security than older VPN types. Each device uses a unique key pair, making it ideal for long-term remote access. - L2TP/IPsec
This is the legacy option. It works but is slower, less secure, and often fails behind NAT or strict firewalls. Ubiquiti now recommends WireGuard or Teleport instead of L2TP/IPsec.
In short, your device builds an encrypted tunnel to the UDM Pro, and the UDM Pro acts as the gateway that decrypts traffic and routes it into your LAN/VLANs based on your firewall and routing rules.
In practice, it turns “remote internet traffic” into “trusted internal traffic” (only for authenticated VPN clients) without exposing your home devices directly to the public internet.
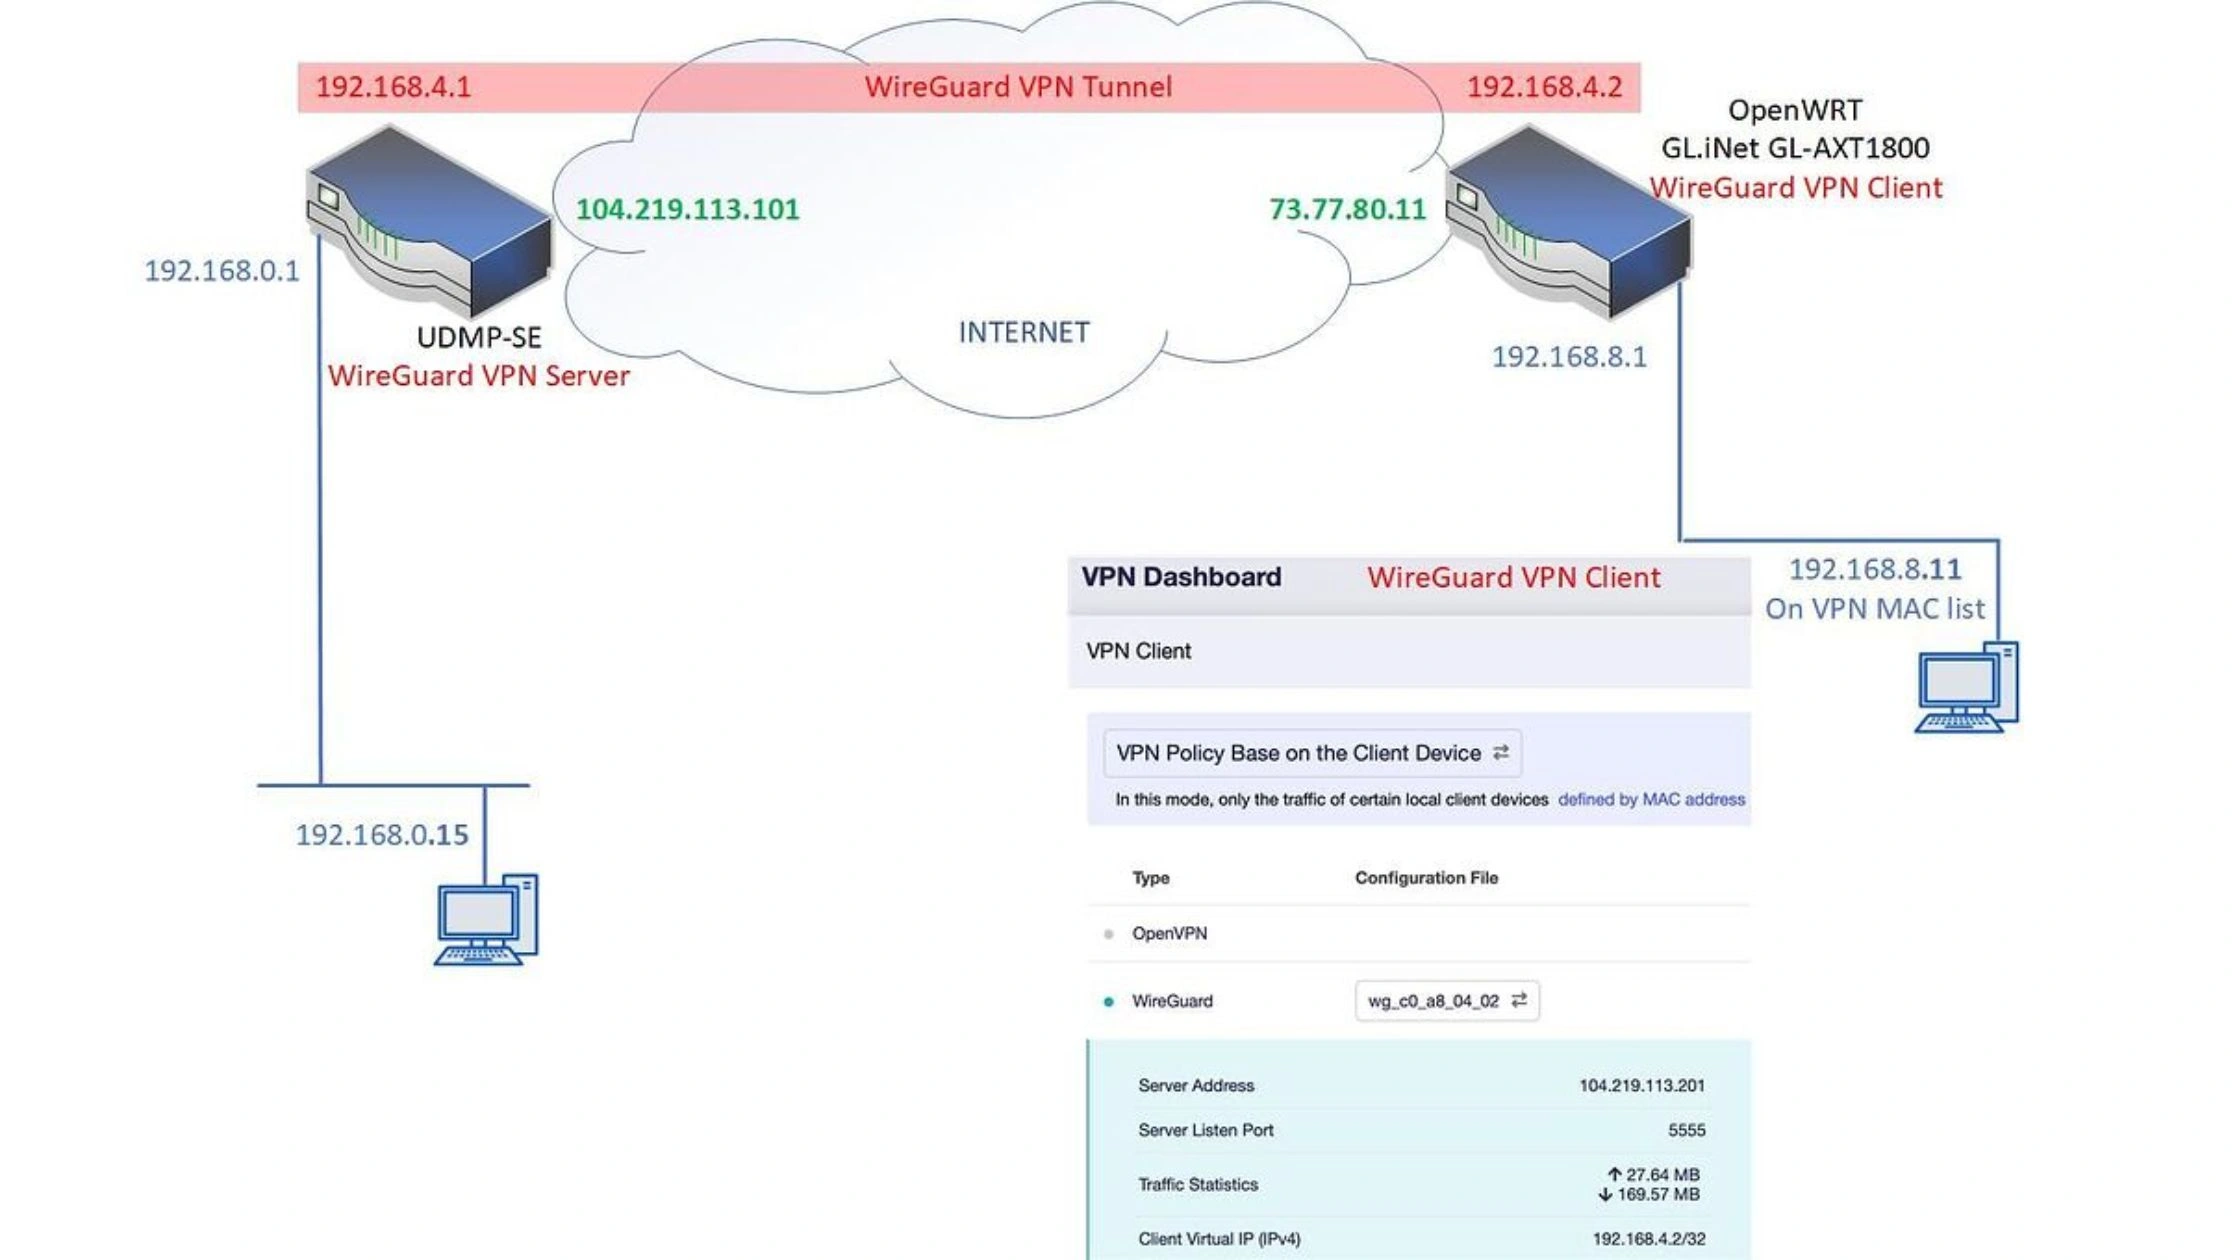
As a VPN Client
When acting as a VPN client, the UDM Pro connects outward to a third-party VPN service, such as TurisVPN. Instead of devices connecting to your home, your home network traffic is sent through an encrypted tunnel to the VPN provider.
Traffic flow and encryption
- The UDM Pro initiates the VPN tunnel to the VPN provider’s server.
- The UDM Pro encrypts outbound traffic before it leaves your home network.
- The encrypted traffic travels over the public internet to the VPN provider.
- The VPN provider decrypts the traffic and forwards it to the destination (websites, services).
- Return traffic is encrypted by the VPN provider, then decrypted by the UDM Pro before reaching your devices.
In this setup:
- The UDM Pro and the VPN provider are the tunnel endpoints.
- End devices (phones, PCs, TVs) do not handle encryption directly.
- ISPs can see encrypted VPN traffic but cannot inspect its contents.
Routing, NAT, and firewall behavior
- UniFi Traffic Routes decides which devices, VLANs, or networks use the VPN tunnel.
- NAT is applied at the VPN interface, so external sites see the VPN provider’s IP, not your home IP.
- Firewall rules still apply before traffic enters the VPN tunnel, allowing you to restrict or segment traffic.
- Non-routed devices continue using the normal WAN connection without VPN impact.
How this works:
- Supported protocols: UniFi supports VPN client connections using: WireGuard and OpenVPN (via configuration files)
- Traffic routing control
After setting up the VPN client, you create Traffic Routes inside UniFi:- Route all home traffic through the VPN
- Or route only specific devices, VLANs, or networks through the VPN
This setup is useful if you want:
- Privacy for your entire home network
- Protection on public IPs
- Geo-routing for certain devices
- Secure outbound access while keeping inbound VPN access separate
How VPN Client differs from VPN Server (high-level)
- VPN Server mode: Remote devices encrypt traffic and connect into your home network. The UDM Pro decrypts and routes traffic internally.
- VPN Client mode: The UDM Pro encrypts traffic and sends it out to a VPN provider. Devices stay local and are unaware of the VPN.
Server mode enables secure remote access, client mode protects outbound traffic and changes public IP exposure.
How to Set Up a VPN to Your Home Network on UDM Pro (Step-by-Step)
Setting up a VPN on the UDM Pro is easier than most people expect. UniFi now offers both one-click options and manual setups for advanced users. Choose the method that fits your needs and skill level.
Method 1: The Easiest Way (Teleport VPN)
Teleport is the fastest and simplest way to access your home network remotely. It is built on WireGuard and requires almost no configuration.
- Step 1: Enable Remote Access: Sign in to your UniFi Console. Go to Settings → Console Settings → Remote Access and make sure your UDM Pro is linked to your UniFi account.
- Step 2: Enable Teleport: Navigate to Settings → Teleport & VPN → Teleport and toggle Enable Teleport VPN.
- Step 3: Create an Invite Link: Click Create Invite. Copy the invitation link. This link is valid for 24 hours and can be regenerated anytime.
- Step 4: Connect from the Client Device
On your phone, tablet, or computer: Install the WiFiman app > Open the invite link > Tap Connect
Teleport automatically creates and manages the WireGuard tunnel. No ports, firewall rules, or manual keys are needed.
Method 2: Manual Configuration (WireGuard Server)
This method gives you full control and is ideal for long-term or multi-device access.
- Step 1: Create a New VPN Server: Go to Settings → VPN → VPN Server and click Create New.
- Step 2: Select WireGuard: Choose WireGuard as the VPN protocol.
- Step 3: Configure Server Settings
Set: Server Address: Your public IP or DDNS hostname. Gateway/Subnet: A non-conflicting range (example: 10.10.10.1/24) or DNS: Optional manual DNS (local or public) - Step 4: Add Client: Click Add Client, give it a name, then: Download the config file (desktop) or scan the QR code (mobile)
- Each client gets its own secure key pair.
- Step 5: Connect the Client: Install the official WireGuard app on the device. Import the config file or scan the QR code. Toggle the tunnel to connect.
Method 3: Manual Configuration (L2TP/IPsec)
This method is supported but no longer recommended unless required for legacy devices.
Step 1: Create a VPN Server: Go to Settings → VPN → VPN Server and click Create New.
Step 2: Select L2TP/IPsec: Choose L2TP as the protocol.
Step 3: Set Authentication
- Create a Pre-Shared Key (PSK)
- Add a dedicated VPN username and password
Step 4: Configure Network Settings
Set: Server address (public IP or DDNS), A unique VPN subnet, Enable Allow weak ciphers only if required for older devices
Important Note: L2TP is slower, less secure, and often fails behind NAT or CGNAT. Use WireGuard or Teleport whenever possible.
How to Connect to Your UDM Pro VPN from Different Devices
Each device connects slightly differently, but the rule is simple: use WiFiman for Teleport, the official WireGuard app for WireGuard, and the built-in VPN client for L2TP/IPsec.
Connecting from Windows (L2TP/IPsec setup)
Windows includes a native L2TP client, so no extra software is needed.
Steps:
- Go to Settings → Network & Internet → VPN → Add VPN
- VPN provider: Windows (built-in)
- Connection name: Any name you like
- Server name or address: Your public IP or DDNS hostname
- VPN type: L2TP/IPsec with pre-shared key
- Enter the PSK, username, and password you created on the UDM Pro
- Save and click Connect
Tip: If the connection fails, confirm your ISP allows L2TP traffic and that your firewall is not blocking UDP ports 500 and 4500.
Connecting from macOS
MacOS supports both WireGuard and L2TP/IPsec, but WireGuard is strongly recommended.
WireGuard (recommended):
- Install WireGuard from the Mac App Store
- Import the .conf file downloaded from the UDM Pro
- Enable the tunnel to connect
L2TP/IPsec (legacy):
- Go to System Settings → Network → VPN → Add VPN Configuration
- Select L2TP over IPsec
- Enter server address, account name, and PSK
- Save and connect
Connecting from iPhone/iPad (iOS)
iOS works seamlessly with both Teleport and WireGuard.
Teleport (easiest):
- Install WiFiman from the App Store
- Open the Teleport invite link
- Tap Connect
WireGuard:
- Install the WireGuard app
- Scan the QR code generated by the UDM Pro
- Toggle the tunnel on
L2TP/IPsec:
- Go to Settings → VPN & Device Management → VPN
- Add L2TP configuration
- Enter server, PSK, username, and password
- Save and connect
Connecting from Android devices
Android fully supports Teleport and WireGuard.
Teleport:
- Install WiFiman from Google Play
- Open the Teleport invite link
- Connect instantly
WireGuard:
- Install WireGuard from Google Play
- Import the config file or scan the QR code
- Activate the tunnel
L2TP/IPsec (if needed):
- Go to Settings → Network → VPN → Add VPN
- Choose L2TP/IPsec PSK
- Enter server address, PSK, and login credentials
- Save and connect
Bottom Line
Setting up a VPN to your home network on a UDM Pro is no longer complicated or risky. UniFi now offers three solid options: Teleport, WireGuard, and L2TP/IPsec, so you can choose between ease, performance, or legacy compatibility. For most users, Teleport or WireGuard are the best choices thanks to higher security, better speed, and fewer networking issues.
Beyond remote access, the UDM Pro also works as a powerful VPN client. Pairing it with TurisVPN lets you protect your entire home network, hide your IP from ISPs, bypass geo-restrictions, and secure devices that cannot run VPN apps on their own.
FAQs
Q1. Does UDM Pro support WireGuard or OpenVPN?
Yes. UDM Pro supports WireGuard natively (as Teleport VPN and manual WireGuard server). It does not support OpenVPN as a VPN server, but it does support OpenVPN as a VPN client for connecting your network to a third-party VPN provider.
Q2. Can I use VPN to access Synology or TrueNAS at home?
Yes. Once connected to your UDM Pro VPN, your device is on the same local network. You can securely access Synology DSM, TrueNAS, SMB shares, web UIs, backups, and media servers as if you were at home.
Q3. Do I need a static IP for remote access VPN?
No, a static IP is not required. You can use Dynamic DNS (DDNS) instead. Teleport VPN works even behind CGNAT or double NAT, making it the easiest option if you don’t have a public static IP.
Q4. Can multiple users connect at the same time?
Yes. Multiple users and devices can connect simultaneously. WireGuard and Teleport are highly efficient and support multiple concurrent connections, as long as your UDM Pro and internet bandwidth can handle the load.