Privacy is a top concern for many iPhone users today. While Safari’s Private Browsing mode helps protect your online activity, it’s not always needed. If you’re wondering how to turn off private browsing on your iPhone, this guide will walk you through the simple steps to disable it in 2024. Learn how to manage your browsing modes effectively for better control over your online privacy.
Key Takeaways
- Private Browsing on iPhone allows you to surf the web without saving your browsing history, cookies, or other data, but it’s not completely private.
- You can easily turn off Private Browsing in iPhone’s Safari browser through the tab groups feature, depending on your iOS version.
- Locked Private Browsing with Face ID or Touch ID is available in iOS 17, adding extra protection to your private tabs.
- To truly protect your online activity, consider combining TurisVPN for enhanced privacy.
What is Private Browsing on iPhone?
Private Browsing on iPhone is a feature in Safari that allows you to browse the web without saving your search history, cookies, or other browsing data. Safari also blocks trackers and hides your IP address for enhanced privacy.
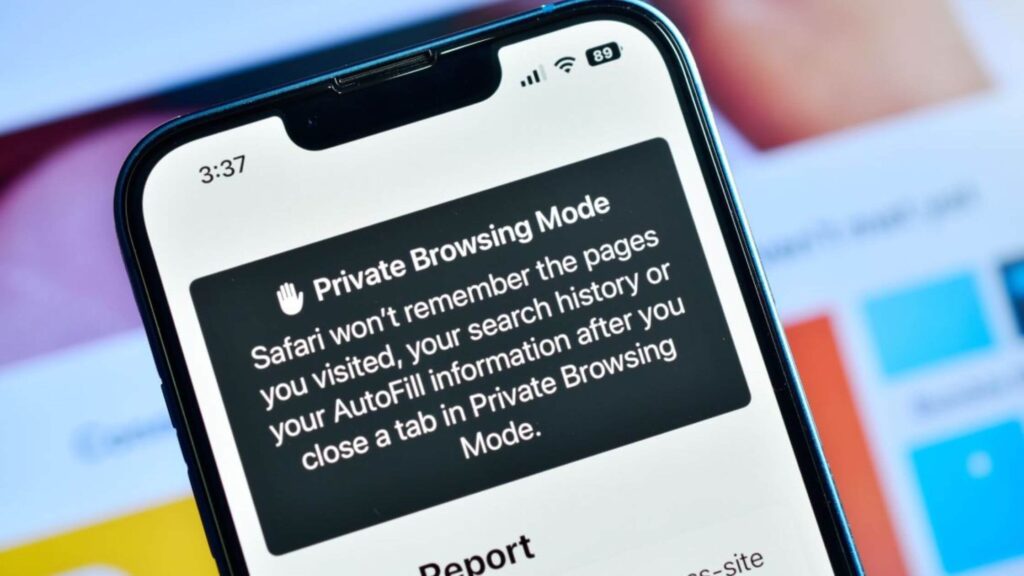
Although Private Browsing offers these protections, it’s important to note that it doesn’t make you completely anonymous online. Your internet service provider (ISP) can still track your activity, and websites may still know you’re visiting from the IP address associated with your VPN or ISP.
This feature is useful for tasks such as checking sensitive information or researching privately. However, it’s not a full privacy solution and should be used along with other tools like VPNs for complete protection.
Why Should You Turn Off Private Browsing?
Private browsing on the iPhone provides limited privacy. It might hide your browsing history from others using your device, but it doesn’t offer complete protection:
- Limited tracking protection: Private browsing doesn’t stop websites, your ISP, or network administrators from tracking your activity. While it hides your searches from your device’s history, external trackers still see your actions.
- Network monitoring: If you’re connected to a work or school network, the administrator can track your online activity. Private browsing won’t prevent them from seeing what you’re doing.
- No defense against malware: Private browsing does not block malware or prevent hackers from accessing your device. If your phone is compromised, incognito mode won’t protect your data.
In the third quarter of 2024 alone, approximately 422.61 million data records were leaked in data breaches, impacting millions of individuals worldwide. These breaches often lead to identity theft, financial losses, and significant personal inconvenience.
How To Turn On Private Browsing in Safari?
Turning on Private Browsing in Safari on your iPhone is simple and quick. Here’s a step-by-step guide for different iOS versions:
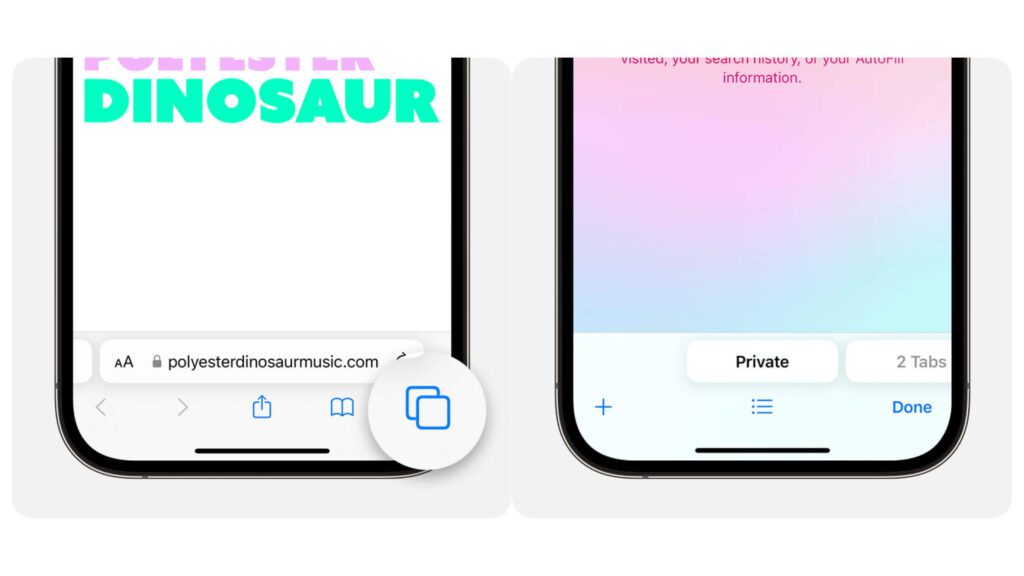
For iOS 17:
- Step 1: Open the Safari app on your iPhone.
- Step 2: Tap the Tabs button at the bottom-right corner of the screen.
- Step 3: Swipe to Private mode
- Step 4: Tap the tab you want to open in Private Browsing mode.
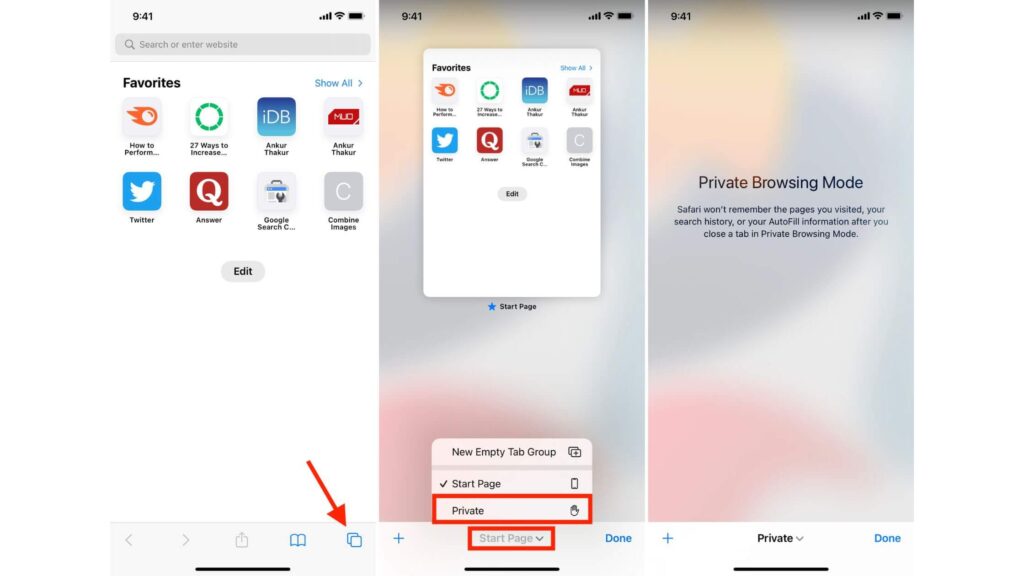
For iOS 16 or earlier:
- Step 1: Open the Safari app.
- Step 2: Tap the tabs icon at the bottom-right corner.
- Step 3: Tap on the number of tabs or “Start Page” to open the Tab Groups list.
- Step 4: Enable private browsing to activate it.
How To Turn Off Private Browsing in iPhone with 4 Steps
If you’re done with Private Browsing mode and want to switch it off, follow these simple steps based on your iOS version:
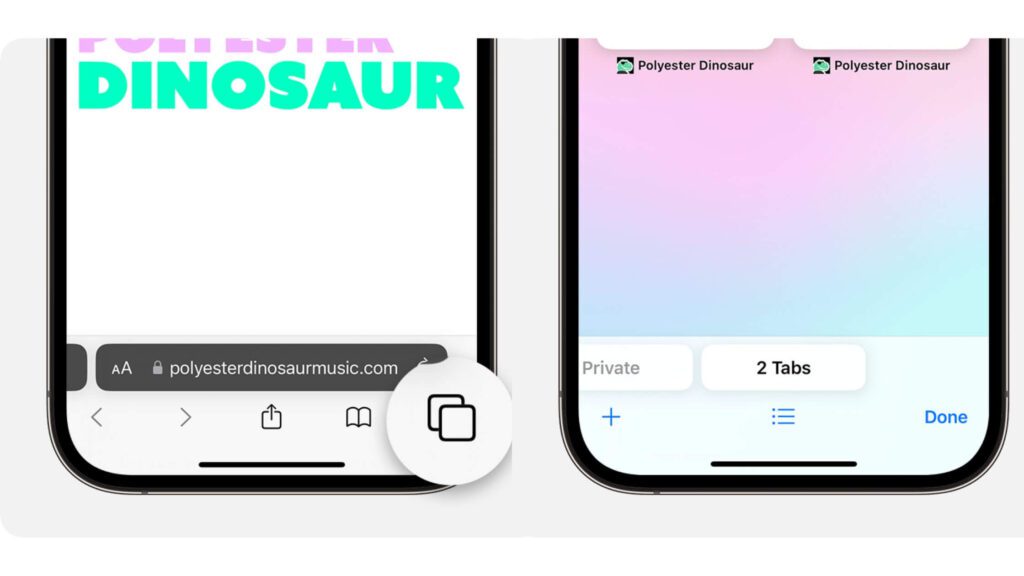
In iOS 17:
- Step 1: Open the Safari app on your iPhone.
- Step 2: Tap the tabs icon at the bottom-right corner of the screen.
- Step 3: Swipe to the regular Tab Group
- Step 4: Tap the regular tab group to switch out of Private Browsing mode.
Now, your Safari address bar will return to white or gray, indicating that Private Browsing is off.
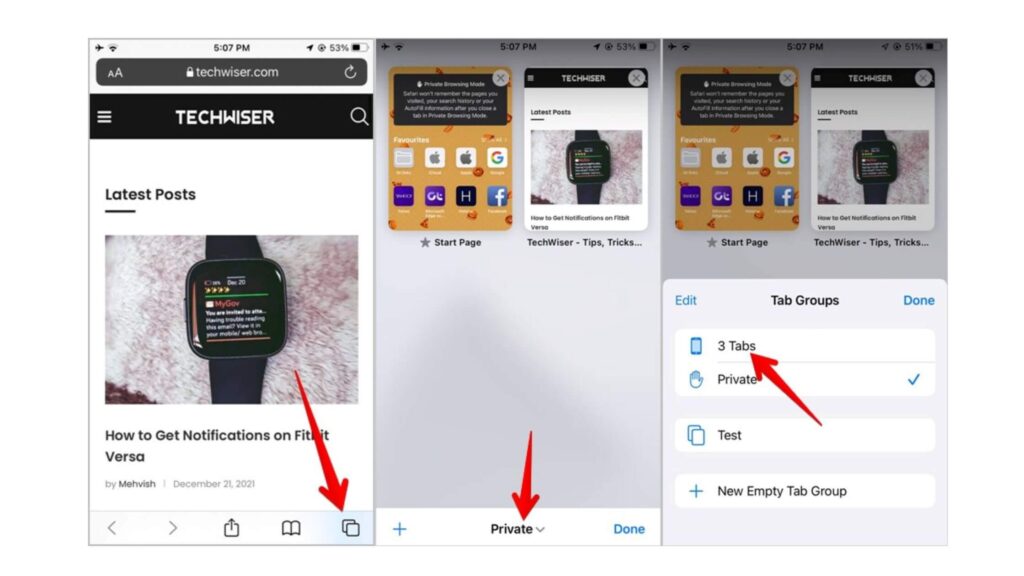
In iOS 16 or earlier:
- Step 1: Open the Safari app on your iPhone.
- Step 2: Tap the tabs icon located at the bottom-right corner.
- Step 3: Disable Private mode
- Step 4: Return to Normal browsing
How to Enable or Disable Locked Private Browsing on iPhone and iPad
With iOS 17, iPadOS 17, and Safari 17, Apple introduced Locked Private Browsing, allowing users to secure private tabs with Face ID or Touch ID for extra protection. Here’s how you can easily enable or disable this feature on your iPhone or iPad:
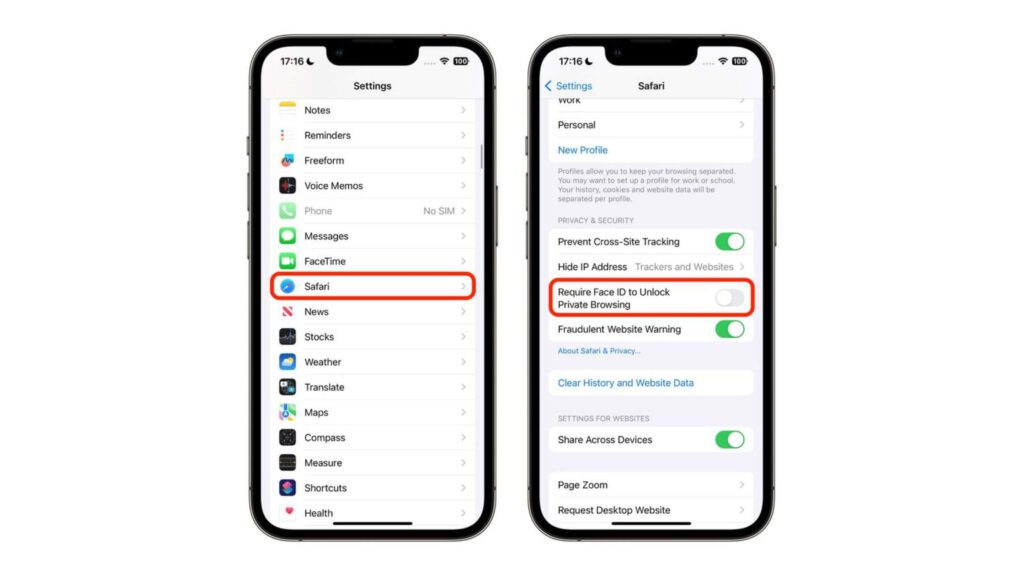
Steps to Enable Locked Private Browsing:
- Step 1: Open Settings on your iPhone or iPad.
- Step 2: Scroll down and tap on Safari to access the browser settings.
- Step 3: In Safari settings, find the Privacy & Security section.
- Step 4: Toggle on Require Face ID or Touch ID to unlock Private Browsing.
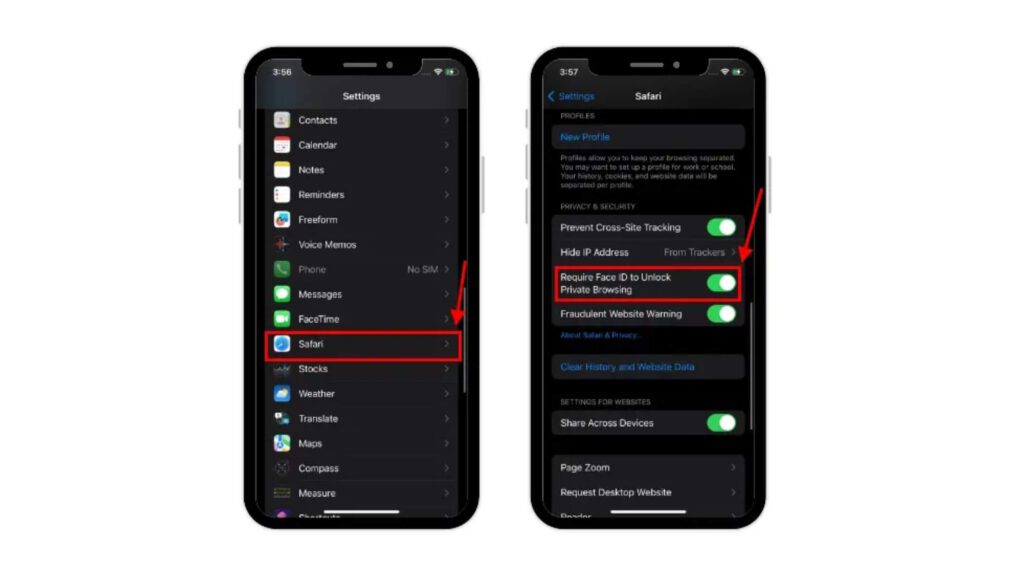
Steps to Disable Locked Private Browsing:
- Step 1: Go to Settings > Safari > Privacy & Security.
- Step 2: Simply toggle off Require Face ID or Touch ID.
How to Permanently Disable Private Browsing in Safari on an iOS Device
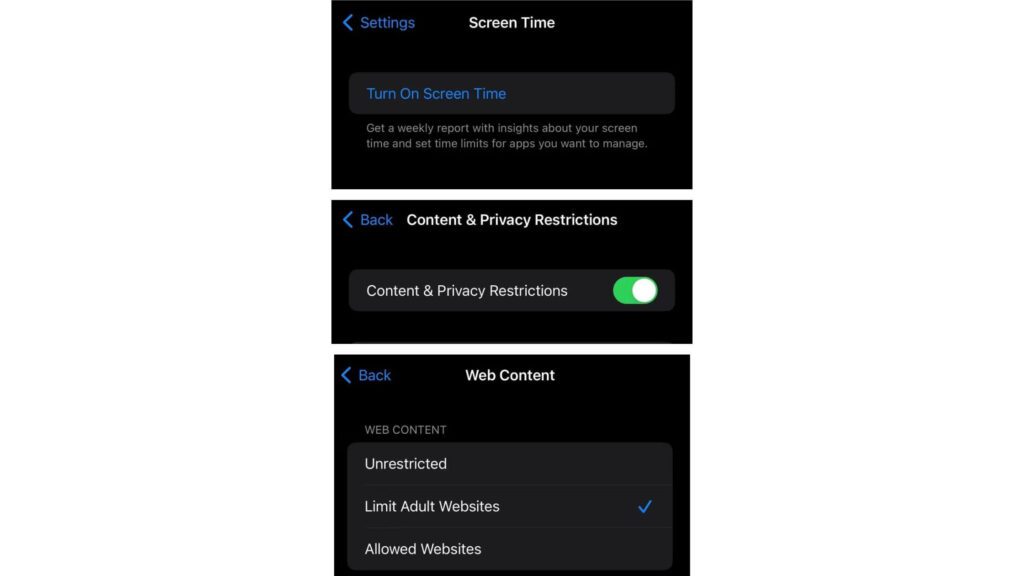
If you want to permanently disable the Private Browsing option in Safari on your iPhone or iPad, here’s a quick and simple guide.
- Step 1: On your iPhone, open the Settings app.
- Step 2: Scroll down and tap on Screen Time.
- Step 3: In the Screen Time menu, tap on Content & Privacy Restrictions.
- Step 4: Tap on Content Restrictions from the list of options.
- Step 5: Select Limit Adult Websites. This setting will disable the Private Browsing feature in Safari and automatically block adult content.
Safeguard your activity on Private Browsing with TurisVPN
While Private Browsing on your iPhone provides a layer of privacy, it does not protect you from all online threats. Websites, ISPs (Internet Service Providers), and even hackers can still track your activity and collect data. To truly secure your online activity, combining Private Browsing with TurisVPN is a smart move.
Easy Steps to Use TurisVPN with Private Browsing:
- Step 1: Download and install TurisVPN app on your iPhone.
- Step 2: Open the app and connect to a VPN server in your preferred location.
- Step 3: Once connected, open Safari and enable Private Browsing mode.
- Step 4: Now you can surf the web privately and securely with the enhanced protection of TurisVPN.
Using TurisVPN alongside Safari’s Private Browsing, you’re not only preventing local data storage but also safeguarding your online activity from external tracking. This extra layer of security is crucial, especially when using public Wi-Fi or browsing sensitive content.
Bottom Line
Turning off Private Browsing on your iPhone is quick and easy, whether you’re using the latest iOS or an older version. While Private Browsing provides some privacy, it’s important to know when and why to turn it off, such as for parental control, better tracking of your online activity, or to enhance security by using tools like TurisVPN.
Follow the steps mentioned in this guide to easily switch between browsing modes and take control of your online experience. For complete privacy, always pair Private Browsing with additional security measures, ensuring a safer browsing experience on your iPhone.
FAQs
Q1. Can you permanently turn off private browsing?
Yes, you can permanently disable Private Browsing on iPhone by using Screen Time settings. Simply go to your iPhone’s Settings, tap on Screen Time, then choose Content & Privacy Restrictions. From there, go to Content Restrictions, and set the Web Content option to “Limit Adult Websites.” This action will remove the option for Private Browsing in Safari.
Q2. Is private browsing on an iPhone really private?
No, Private Browsing on an iPhone is not completely private. While it prevents Safari from saving your browsing history, cookies, and cached files on your device, it does not hide your activity from websites, internet service providers (ISPs), or network administrators. For enhanced privacy, it’s recommended to use TurisVPN to mask your IP address and encrypt your browsing activity.
